
Lighted Peppermint Candy Ornament - Crochet Pattern


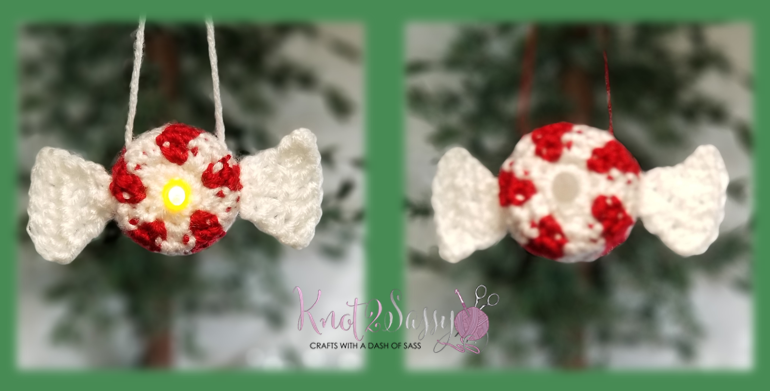
This peppermint candy will bring a smile to your face with no sugar added! Perfect for a gift topper or stocking stuffer.

Do you like to shop as much as I do? The following article contains links to some of my favorite places. When you shop by clicking these affiliate links, I may get a small compensation. This means it’s a WIN – WIN!! You get to shop for fantastic products, and I get to keep bringing you great content! I thank you for helping support my small business.


Yarn

Scrap amounts #4 worsted weight yarn.
White (A)
Red (B)

Materials / Tools

Size G / 4.0mm crochet hook 
Battery operated tea light
stitch marker
scissors
yarn needle

Difficulty 

Easy

Stitch Guide

ch - chain
st - stitch 
sl st - slip stitch 
sc - single crochet
dc - double crochet

Notes: The body of this project is worked in continuous rounds not joining. You will want to carry the non-working yarn under the stitches of the working yarn as you change the colors.


INSTRUCTIONS

CANDY

Round 1: With (A) make 10 sc in a magic circle making sure not to pull the center closed. Use a stitch marker to keep track of each round by placing it in the first stitch and move it up for each round. (10 sc)
 
Round 2: *Work 2 sc in next st – change to (B), work 2 st in next st – change to (A), repeat from * around. (20 sc) 


* At this point I like to place the “flame” of the candle into the center hole and adjust making sure it fits snugly then I secure and weave in the center yarn tail.

 
Rounds 3-7: sc in each stitch, working 2 in color (A) then 2 in color (B) around. 
Round 8 (optional): Repeat one more time if needed to fit tealight.

WRAPPER ENDS (Make 2)

Row 1: With (A) ch 2, work 2 sc in 2nd ch from hook, turn

Row 2: ch 2, work 2 dc in each st, turn (4 dc)

Row 3: ch 2, 2 dc in first st, dc in next 2 st, 2 dc in last st, finish off. (6 dc)


ASSEMBLY

Sew the “wrapper ends” on each side at the 6th row. Loop a piece of yarn or ribbon through top for hanger, secure.

Insert tea light in center of magic ring, weave yarn tail around last round, tightening to fit snugly around base of tea light, make sure on/off button is still operational. Weave in all ends.


🕯🍬 Make the whole collection of lighted ornaments by clicking 'Lighted Ornaments' on the menu at the top of the page!


May Your stitch count be true, and your frogs be few!

Tracee


© COPYRIGHT NOTICE: Knot 2 Sassy articles, patterns, images, & graphs are copyrighted, all rights are owned by Tracee Fromm. Do not reproduce, share, or resell purchased patterns & featured images without written express permission from Tracee Fromm. You are more than welcome to sell items made from Knot 2 Sassy patterns; credit to the designer is greatly appreciated (example: Made from a Knot 2 Sassy Pattern). Knot 2 Sassy photos cannot be used for selling purposes or modified in any way. Copyright © 2022

Comments

Popular posts from this blog

Lighted Reindeer Ornament - Crochet Pattern

  Santa can't get around on Christmas without his trusty reindeer powered sleigh! And this guy - with a nose that lights up is the most impotant one on the team! This lighted reindeer ornament makes a perfect gift topper or stocking stuffer. Do you like to shop as much as I do? The following article contains links to some of my favorite places. When you shop by clicking these affiliate links, I may get a small compensation. This means it’s a WIN – WIN!! You get to shop for fantastic products, and I get to keep bringing you great content! I thank you for helping support my small business. YARN Scrap amounts of any worsted weight #4 yarn Dark Brown (A)  Light Brown (B) HOOK & OTHER MATERIALS US Size G/6 (4.0mm) crochet hook  Battery-operated tea light  2 - 10 mm wiggle eyes (optional)  3D fabric paint – red  Permanent marker – red  Craft glue  Stitch marker  Yarn needle SKILL LEVEL Easy SIZES/FINISHED MEASUREMENTS 2 ¾” x 3 ½” GAUGE 4 sc and 4 rows = 1”   Adjust hook size if neces

Lighted Daisy Ornament - Crochet Pattern

Daisies are such a cute flower to decorate for spring and summer! Quick and easy to make. A perfect way to lighten and brighten your day or someone else’s if given as a gift. **Do you like to shop as much as I do? The following article contains links to some of my favorite places. When you shop by clicking these affiliate links, I may get a small compensation. This means it’s a WIN – WIN!! You get to shop for fantastic products, and I get to keep bringing you great content! I thank you for helping support my small business. YARN Scrap amounts of any worsted weight #4 yarn. • Yellow (A) • White (B) HOOKS & TOOLS G/  4.0 mm hook Stitch Markers Scissors Yarn Needle SKILL LEVEL Easy  SIZES / FINISHED MEASUREMENTS  5 ½” diameter GAUGE 4 sc and 4 rows = 1” Adjust hook size if necessary to obtain gauge. STITCH ABBREVIATIONS ch = chain sc = single crochet hdc = half double crochet FLO = front loop only BLO = back loop only NOTES 1. Similar weight yarns can be substituted, please check

Lighted Santa Claus Ornament - Crochet Pattern

  Time for the CEO of Christmas gift giving himself, Santa! No Christmas tree would be complete without him and the spirit of giving he represents. Do you like to shop as much as I do? The following article contains links to some of my favorite places. When you shop by clicking these affiliate links, I may get a small compensation. This means it’s a WIN – WIN!! You get to shop for fantastic products, and I get to keep bringing you great content! I thank you for helping support my small business. YARN Scrap amounts of any worsted weight #4 yarn. Light Pink (A) White (B) Red (C) HOOK & OTHER MATERIALS US Size G/6 (4.0mm) crochet hook Battery-operated tea light 2 - 10 mm wiggle eyes  ¼ inch white pompom 3D fabric paint - red  Craft glue Stitch marker Yarn needle SKILL LEVEL Easy STITCH GUIDE ch - chain st - stitch  sl st - slip stitch  sc - single crochet hdc - half double crochet SIZES/FINISHED MEASUREMENTS 2 ¾” x 3 ½” GAUGE 4 sc and 4 rows = 1” Adjust hook size if necessary to obt